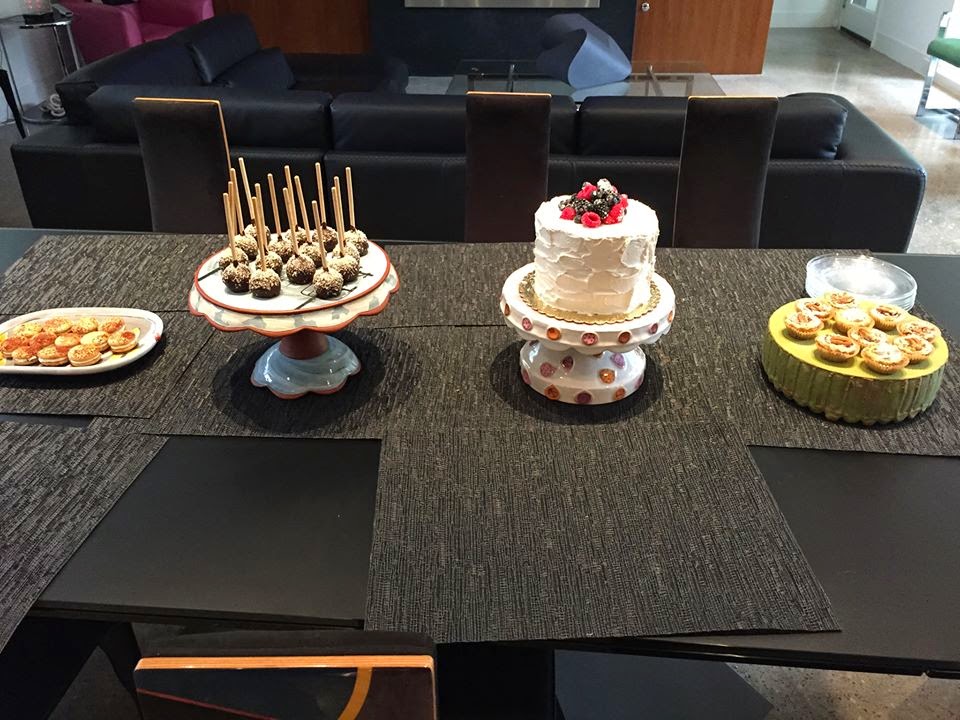
 |
| Nice ceramic and baked goods spread at the Rosenfields. |

Showing posts with label functional. Show all posts
Showing posts with label functional. Show all posts
Saturday, November 22, 2014

Wednesday, November 12, 2014
Inspiration for Makenna and all!
 |
| Emily Schroeder |
 |
| Kristen Kieffer |
 | |
| A. Blair Clemo |
Tuesday, November 11, 2014
Candle Sticks!
 |
| Bertie Smith |
 |
| Anthony Sonnenberg |
Friday, November 7, 2014
cake stands
 |
| reproduction of 1930s-era glass cake stand; D’lovely cake stand, fergusonpottery on Etsy |
 |
| Kari Radasch’s cake stand with confetti cake |
 |
| The Husband Catcher Cake, oil painting by Janet Hill |
 |
| Kristen Keiffer |
Wednesday, November 5, 2014
cake and flowers oh my!
Check out my research for you on Pinterest and look at this amazing multi-use flower brick! Images courtesy of last semester's visiting artist Louise Rosenfield!

 |
| Lowfire terracotta in 3 parts |
 |
| The bottom flips over to become a serving tray as well as a flower brick stand. |
Monday, November 3, 2014
For Larry Paul and everyone else too!
Craft in America on PBS
Click here for full episode of Episode XIII: Service
Documenting craft and the military and the power of the handmade to inspire and heal. Featuring papermaker Pam DeLuco, saddler Eugene Burks Jr., and ceramic artists Ehren Tool, Judas Recendez and Peter Voulkos.
Click here for full episode of Episode XIII: Service
Documenting craft and the military and the power of the handmade to inspire and heal. Featuring papermaker Pam DeLuco, saddler Eugene Burks Jr., and ceramic artists Ehren Tool, Judas Recendez and Peter Voulkos.
Tuesday, October 28, 2014

Wednesday, October 15, 2014
Handbuilt Functional Bowls: Emily Schroeder Willis!

 | |
| Both bowls made from porcelain and fired to cone 6 in an oxidation electric kiln. Look at those detail. Love the subtle cutout on the foot. See more of her work here. |
Wednesday, October 8, 2014
For Adrianna
Clay
Leonard. This is his work titled, "Oval Bowl Set",
hand-built porcelain, cone 6, 14 x 8 x 7,”. See the rest of his work at http://artaxis.org/

 |
| Could be a nice start for your research conversation cups! |
 |
Par le céramiste Joe Christopherson. |
Monday, October 6, 2014
 |
| Photo: Ayumi Horie |
Thursday, October 2, 2014
Cups cups and more cups! Charlie Cummings Gallery
 |
| http://claylink.com/zen/index.php?main_page=index&cPath=83_239 |
Wednesday, October 1, 2014
12 expert glazing tips from Ceramic Arts Daily
 I have to admit, glazing is not my favorite part of the ceramic process. It’s probably because of its potential to make or break a good pot (and believe me, I have “broken” quite a few with poor glaze application). I tend to be a bit of a sloppy glazer and I sometimes rush through it a little more quickly than I should. Denver, Colorado ceramic artist Annie Chrietzberg is the polar opposite of me in the glaze room: methodical and precise. I know my glazing outcomes could be greatly improved if I followed just a couple of Annie’s tips. So I am sharing them with the community in today’s post (an excerpt from our new free download How to Make Pottery: How to Learn Pottery Techniques and Enjoy Working with Clay). Hopefully you will benefit from Annie’s advice too! – Jennifer Harnetty, editor. |
|
| For
complex forms consisting of thrown and textured elements, I use a
combination of pouring, dipping and brushing to get the color where I
want it. Dipping is the easiest way to ensure an even application, and
pouring, with a little practice, is the next. Brushing takes more
practice, time and attention, and I only use it when the first two
methods are not options for a tricky place on a pot. The
two troublemakers involved with glaze application are water and
gravity. When a bisque pot becomes too saturated with water, it won’t
accept glaze correctly, so use the least amount of water possible when
glazing, including when you are making corrections. And as for gravity, I
doubt there’s anyone who hasn’t experienced the wayward drip of one
glaze marring the perfect application of the previous glaze. |
|
This article was excerpted from the Tips from the Pros department of a back issue of Pottery Making Illustrated. To see more of what Pottery Making Illustrated has to offer, check out the latest issue here. |
|
| 12 Tips for Glazing Success | |

Click images to enlarge!
 •
Remove all dust before glazing including bisque dust, studio dust and
even household or street dust. Use an air compressor for foolproof
results, but work outside or in a well-ventilated area away from your
primary workspace, as bisque dust is extremely abrasive to your lungs. •
Remove all dust before glazing including bisque dust, studio dust and
even household or street dust. Use an air compressor for foolproof
results, but work outside or in a well-ventilated area away from your
primary workspace, as bisque dust is extremely abrasive to your lungs. •
Use silicon carbide paper to remove any rough spots you missed before
bisque firing. Place your work on a piece of foam to prevent chipping.
After sanding, wipe with a damp sponge to remove all traces of sanding
dust. Use a damp sponge instead of rinsing, which should be kept to a
minimum. Wring the sponge thoroughly and rotate it so each area is only
used once. I tend to use half a dozen or so of those orange round
synthetic sponges during any given glazing session. •
Use silicon carbide paper to remove any rough spots you missed before
bisque firing. Place your work on a piece of foam to prevent chipping.
After sanding, wipe with a damp sponge to remove all traces of sanding
dust. Use a damp sponge instead of rinsing, which should be kept to a
minimum. Wring the sponge thoroughly and rotate it so each area is only
used once. I tend to use half a dozen or so of those orange round
synthetic sponges during any given glazing session. •
Glazes must be well mixed. I use an electric drill with a Jiffy Mixer
attached. If there is dry glaze caked on the sides of the bucket, sieve
the glaze, then return it to a clean bucket. •
Glazes must be well mixed. I use an electric drill with a Jiffy Mixer
attached. If there is dry glaze caked on the sides of the bucket, sieve
the glaze, then return it to a clean bucket. •
Glaze all the interiors of your pots first by pouring the glaze in,
then rolling it around for complete coverage. For complex pieces
requiring a number of glazing steps, glaze the insides the day before to
give you a drier surface to work with, especially for brushing. •
Glaze all the interiors of your pots first by pouring the glaze in,
then rolling it around for complete coverage. For complex pieces
requiring a number of glazing steps, glaze the insides the day before to
give you a drier surface to work with, especially for brushing. •
When removing unwanted glaze, scrape off as much of it as you can with a
dental tool or a similar small metal scraper to keep a sharp line. A
damp sponge removes the remaining glaze with a few strokes, keeping
water usage to a minimum. •
When removing unwanted glaze, scrape off as much of it as you can with a
dental tool or a similar small metal scraper to keep a sharp line. A
damp sponge removes the remaining glaze with a few strokes, keeping
water usage to a minimum.• Use a stiff brush to help clean glaze drips out of texture.  •
For dipping glazes, select an appropriately sized container for the
work at hand. I have lots of different sizes of shallow bowls that are
perfect for dipping the sides of my pieces. Wide shallow bowls allow me
to see what I’m doing, so I even use them for smaller things that fit
into the glaze bucket. •
For dipping glazes, select an appropriately sized container for the
work at hand. I have lots of different sizes of shallow bowls that are
perfect for dipping the sides of my pieces. Wide shallow bowls allow me
to see what I’m doing, so I even use them for smaller things that fit
into the glaze bucket. •
When you can’t dip or pour, it’s time for brushing. Watch your bisque
as you brush—glaze is shiny and wet when first applied, then becomes
matt as the bisque absorbs the water. If you recoat too soon over a damp
coat, you’ll move the foundation layer rather than imparting a second
coat. Consider gravity when brushing and hold the pot both to encourage
the glaze to go where you want it to and to keep it from running where
you don’t want it. •
When you can’t dip or pour, it’s time for brushing. Watch your bisque
as you brush—glaze is shiny and wet when first applied, then becomes
matt as the bisque absorbs the water. If you recoat too soon over a damp
coat, you’ll move the foundation layer rather than imparting a second
coat. Consider gravity when brushing and hold the pot both to encourage
the glaze to go where you want it to and to keep it from running where
you don’t want it. •
If a drip flows onto a previously glazed surface, stop, set the pot
down and wait. Resist the urge to wipe the drip with a sponge. Let the
drip dry, then carefully scrape it off with a dental tool or metal rib.
Use a small compact brush to wipe away glaze in areas you can’t reach
with a sponge. •
If a drip flows onto a previously glazed surface, stop, set the pot
down and wait. Resist the urge to wipe the drip with a sponge. Let the
drip dry, then carefully scrape it off with a dental tool or metal rib.
Use a small compact brush to wipe away glaze in areas you can’t reach
with a sponge. •
Don’t brush glaze from the big glaze bucket. Pour a small amount into a
cup, then briskly stir it occasionally to ensure that it stays properly
mixed. Keep a large, damp sponge nearby to keep the brush handle clean.
Stray drips often start with a handle full of glaze. •
Don’t brush glaze from the big glaze bucket. Pour a small amount into a
cup, then briskly stir it occasionally to ensure that it stays properly
mixed. Keep a large, damp sponge nearby to keep the brush handle clean.
Stray drips often start with a handle full of glaze.• If you’re glazing pots that don’t have a defined foot, push them across a piece of 220-grit silicon carbide sandpaper. The sandpaper removes some of the glaze from the contact areas, indicating where you need to wipe off the remaining glaze. |

Monday, September 29, 2014
Sunday, September 21, 2014
Call for Entries
The University of Dallas invites you to participate in a juried ceramic competition featuring artists living in the central south region of the United States.
 |
Eva Kwong, known for abstracted work that are colorful and sensuous forms inspired by natural objects. |
Internationally recognized ceramic artist Eva Kwong will be selecting artists for the 2015 University of Dallas Regional Juried Ceramic Competition. From a selected field of artists, Eva will issue distinctions of "Awards of Merit" and present two deserving artists with "Best of Show" awards. Solo exhibitions will be scheduled in the following academic year for the "Best of Show" award winners.
This show is open to ceramic artists over the age of 18 who currently reside in the states of Arkansas, Colorado, Kansas, Louisiana, Missouri, New Mexico, Oklahoma and Texas. Submitted functional or sculptural works must use clay as the dominant material and must have been created within the past two years.
The postmark deadline for entering this show is November 20, 2015.
This show is open to ceramic artists over the age of 18 who currently reside in the states of Arkansas, Colorado, Kansas, Louisiana, Missouri, New Mexico, Oklahoma and Texas. Submitted functional or sculptural works must use clay as the dominant material and must have been created within the past two years.
The postmark deadline for entering this show is November 20, 2015.
To access this year's prospectus, view the show history, and apply online, please use the following link:
http://udallas.edu/constantin/
Monday, September 1, 2014
Historic cup... our ancestors had a sense of humor


Friday, August 29, 2014

personal pinch cup inspiration

-1.jpg) |
| stamps: Kristen Kieffer |
 |
| carving: Matthew Metz |
 |
| paddled: Brian Jones |

 |
| Shoko Teruyama |
Wednesday, August 20, 2014
Welcome!
Eastfield students welcome to Handbuilding Ceramics Fall 2014!
Missing class and not looking at this blog is one way to fall behind so bookmark and check in often for inspiration, assignments info, calendar updates, important news, technical info and artist research.
 Lesson 1: Ming Dynasty Fu Dog 1968 AD = Traditional, historic and gorgeous glazed terracotta
or fabulous contemporary functional ware like Margaret Bohls

Lesson 2: Kristen Morgin= unfired life-like sculpture

 or Jeanne Quinn's sculptural installations = Unexpected, informative and sometimes even unfired!

Missing class and not looking at this blog is one way to fall behind so bookmark and check in often for inspiration, assignments info, calendar updates, important news, technical info and artist research.
I hope your ready to learn a few new things and challenge your ideas and expectations about contemporary clay in the world. That said, let's begin:

or fabulous contemporary functional ware like Margaret Bohls
Lesson 2: Kristen Morgin= unfired life-like sculpture

Lesson 3: Ai WeiWei's installation of millions of ceramic sunflower seeds = Clay can reference the past and have a contemporary language full of consequence and power.

"It is a work of great simplicity and complexity. Sunflower Seeds
refers to everyday life, to hunger (the seeds were a reliable staple
during the Cultural Revolution), to collective work, and to an
enduring Chinese industry."- Adrian Searle's review for the Guardian
Lesson 4: Form follows Function. Beauty must not overshadow functionality...
 |
| Lauren Meaden |
Subscribe to:
Posts (Atom)